Do you have a basement or another room that is constantly damp and needs regular ventilation – or wastes a lot of energy when you heat it? A dew point ventilation system offers a smart solution: it automatically measures air conditions and ensures ventilation when it is most effective.
After the drastic rise in heating costs in winter 2022/2023, I significantly reduced the heating in a rarely used, large-volume room – down to only 8 °C. To prevent pipes from freezing and mold from forming, I installed an automatic dew point ventilation system. The result: significantly reduced heating costs – and no mold in the room.
Theory
Humidity is measured relatively in percent (relative humidity). Relative humidity describes how much water is in the air compared to the maximum amount the air can hold at its current temperature. If the temperature changes, the amount of water the air can hold also changes. When the temperature decreases, the amount of water it can hold becomes smaller; when the air warms up, it can hold more water.
If the amount of water in the air stays the same and the temperature increases, relative humidity decreases. If the temperature decreases, humidity rises until it reaches a maximum of 100%. The air temperature at which humidity would reach 100% and condensation begins is called the dew point. The dew point can therefore be used as a measure to compare air masses with different temperatures and humidity levels. Air with a lower dew point contains less water than air with a higher dew point.
So if you want to ventilate optimally, you should wait for a time when the outside air has a lower dew point than the air inside a damp room. If the dew point of the outside air is higher, ventilation is actually counterproductive, because you bring more moisture into the room than is already present. Especially in summer, outside air often contains more moisture, since warm air can hold more water than your cooler basement air.
From my measurements, I observed that the best time to ventilate is especially in the early morning at sunrise, since the outside air is usually at its driest. But let’s look at it more precisely.
Mold can develop with a permanent humidity level of 60% or more. (Source: Verbraucherzentrale)
In another post I describe a notification feature for good ventilation times, which uses 61% as a threshold and also works with dew points.
TL;DR
- Relative humidity describes how much water the air contains compared to the maximum it can hold at its current temperature.
- When the temperature drops, the air can hold less water – when humidity reaches 100%, condensation begins.
- This point is called the dew point – it helps to compare air with different temperatures and humidity levels.
Your benefits at a glance
- Automatic control based on humidity and dew point
- Protection against mold
- Efficient use of outside air – ventilate only when it is effective
- Cost and energy savings, as demonstrated in the DIY example
Hardware
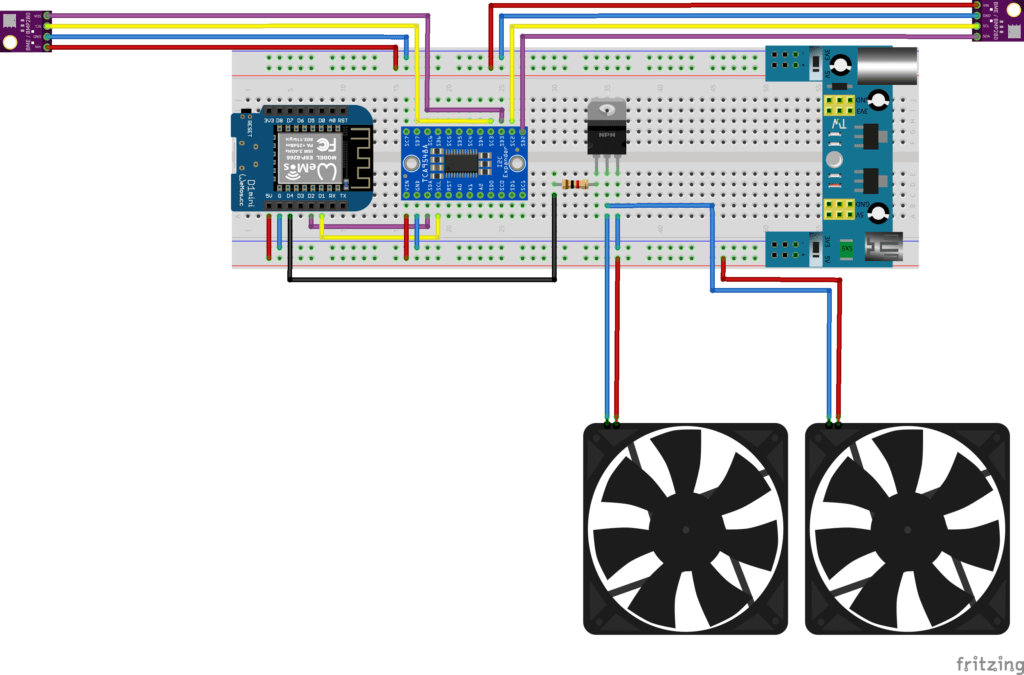
The hardware parts can already be seen in the diagram below. Some components can certainly be replaced with alternatives. I used the following components:
- 1x D1 Mini NodeMcu with ESP8266
- 1x TCA9548A I2C switch
- 2x BME280 sensor
- 1x resistor: 1kΩ
- 1x TIP122 transistor NPN
- 2x 70cm 4-pin Dupont cables male to female (for easy sensor connection)
- Jumper wires
- 120mm PC fan (as many as you think you need)
- 1x Breadboard
- 1x Breadboard Power Supply MB120
- 1x DC power adapter 12V 5A suitable for the breadboard power supply
- Optional: Plexiglass fitting the opening where you want to control airflow
You can then wire it as shown below. I use D4 as the signal pin to activate the fans. D1 and D2 are used to connect the I2C switch and from there channels 2 and 3 for the sensors, but you can also change them. Just remember to update the configuration later. The sensor on channel 3 is for indoors, the sensor on channel 2 is for outdoors.
The fans are installed so that they extract the damp air from the room. Fresh, drier air then flows in from elsewhere.
Software
1) Before or after assembly, the ESP8266 needs to be flashed with software. With ESPHome this is very simple once you have initialized it. Python is available not only for Linux, but also for Windows. If you don’t have Linux installed but want to use it, you can also run it inside a VirtualBox. I even managed to use ESPHome from Windows with Portable Python.
1.1) Note: Under Ubuntu 22.04 the ESP is not recognized correctly by default. Two additional steps are required here:
- Remove brltty
sudo apt remove brltty #removes brltty, do not remove if you need this because of blindness!- Install the CH340x driver
or use an earlier Ubuntu version.
For Windows and usually also other Ubuntu versions, the ESP can be provisioned quite easily without step 1.1).
2) Connect your ESP8266 to your computer and provision it with web.esphome.io.
3) Then use the following ESPHome configuration:
(after adapting name, Wi-Fi and MQTT to your network)
esphome:
  name: esp-fan-controller

esp8266:
  board: d1_mini
  #board: nodemcuv2

# Enable logging
logger:
  tx_buffer_size: 256
  #level: NONE
  #level: VERBOSE

web_server:
  port: 80

ota:
#  password: ""

wifi:
  networks:
  - ssid: "XXXXX"
    password: "XXXXX"
  reboot_timeout: 2min


#https://esphome.io/components/i2c.html
i2c:
  id: i2c_main
  scl: D1
  sda: D2
  scan: true
  frequency: 20kHz

tca9548a:
  - address: 0x70
    id: multiplex0
    i2c_id: i2c_main
    channels:
      - bus_id: i2c_0
        channel: 2
      - bus_id: i2c_1
        channel: 3

sensor:
  - platform: uptime
    id: uptime_id
    name: "Uptime"
    update_interval: 15s

  #BME/P280
  #https://esphome.io/components/sensor/bme280.html
  - platform: bme280
    i2c_id: i2c_0
    temperature:
      name: "BME-T 2 (out)"
      id: bme280_0_temperature
      oversampling: 8x
      filters:
        - filter_out: NaN
    pressure:
      name: "BME-P 2 (out)"
      id: bme280_0_pressure
      filters:
        - filter_out: NaN
    humidity:
      name: "BME-H 2 (out)"
      id: bme280_0_humidity
      filters:
        - filter_out: NaN
    address: 0x76
    update_interval: 30s
  - platform: template
    name: "Dew Point 2 (out)"
    id: bme280_0_dewpoint
    lambda: |-
      return (243.5*(log(id(bme280_0_humidity).state/100)+((17.67*id(bme280_0_temperature).state)/
      (243.5+id(bme280_0_temperature).state)))/(17.67-log(id(bme280_0_humidity).state/100)-
      ((17.67*id(bme280_0_temperature).state)/(243.5+id(bme280_0_temperature).state))));
    unit_of_measurement: °C
    icon: 'mdi:thermometer-alert'
    filters:
      - filter_out: NaN
  - platform: bme280
    i2c_id: i2c_1
    temperature:
      name: "BME-T 3 (in)"
      id: bme280_1_temperature
      oversampling: 8x
      filters:
        - filter_out: NaN
    pressure:
      name: "BME-P 3 (in)"
      id: bme280_1_pressure
      filters:
        - filter_out: NaN
    humidity:
      name: "BME-H 3 (in)"
      id: bme280_1_humidity
      filters:
        - filter_out: NaN
    address: 0x76
    update_interval: 30s
  - platform: template
    name: "Dew Point 3 (in)"
    id: bme280_1_dewpoint
    lambda: |-
      return (243.5*(log(id(bme280_1_humidity).state/100)+((17.67*id(bme280_1_temperature).state)/
      (243.5+id(bme280_1_temperature).state)))/(17.67-log(id(bme280_1_humidity).state/100)-
      ((17.67*id(bme280_1_temperature).state)/(243.5+id(bme280_1_temperature).state))));
    unit_of_measurement: °C
    icon: 'mdi:thermometer-alert'
    filters:
      - filter_out: NaN


button:
  #https://esphome.io/components/button/restart.html
  - platform: restart
    name: "Restart"

switch:
  #Digital Pins
  - platform: gpio
    id: gpio_d4
    name: "Fans"
    pin: D4


http_request:
  id: http_request_data
  useragent: esphome/device
  timeout: 10s

interval:
  - interval: 30s
    then:
      - if:
          condition:
            lambda: |-
              return id(bme280_0_dewpoint).state + 2.0 < id(bme280_1_dewpoint).state;
          then:
            - switch.turn_on: gpio_d4
          else:
            - switch.turn_off: gpio_d4
  - interval: 30s
    then:
      - http_request.post:
          url: !lambda |-
            const size_t capacity = JSON_OBJECT_SIZE(10);
            DynamicJsonDocument root(capacity);

            root["name"] = "NeuensteinKeller";
            root["uptime"] = id(uptime_id).state;
            root["bme280_0_temperature"] = id(bme280_0_temperature).state;
            root["bme280_0_pressure"] = id(bme280_0_pressure).state;
            root["bme280_0_humidity"] = id(bme280_0_humidity).state;
            root["bme280_0_dewpoint"] = id(bme280_0_dewpoint).state;
            root["bme280_1_temperature"] = id(bme280_1_temperature).state;
            root["bme280_1_pressure"] = id(bme280_1_pressure).state;
            root["bme280_1_humidity"] = id(bme280_1_humidity).state;
            root["bme280_1_dewpoint"] = id(bme280_1_dewpoint).state;

            String jsonPayload;
            serializeJson(root, jsonPayload);

            return ((String) "https://mystryx.dd-dns.de/files/json_receiver/?name=NeuensteinKeller&json=" + jsonPayload).c_str();

          headers:
            Content-Type: application/json
          verify_ssl: false
          json: |-
            root["name"]                = "NeuensteinKeller";
            root["uptime"]              = id(uptime_id).state;
            root["bme280_0_temperature"]= id(bme280_0_temperature).state;
            root["bme280_0_pressure"]   = id(bme280_0_pressure).state;
            root["bme280_0_humidity"]   = id(bme280_0_humidity).state;
            root["bme280_0_dewpoint"]   = id(bme280_0_dewpoint).state;
            root["bme280_1_temperature"]= id(bme280_1_temperature).state;
            root["bme280_1_pressure"]   = id(bme280_1_pressure).state;
            root["bme280_1_humidity"]   = id(bme280_1_humidity).state;
            root["bme280_1_dewpoint"]   = id(bme280_1_dewpoint).state;
Ich verwende meine Konstruktion in einem anderen Netzwerk uns sende mir die Daten selbst. Die HTTP-Requests sind zur Funktion nicht notwendig. Das letzte Interval kannst du für deine Zwecke vielleicht entfernen oder muss von dir angepasst werden.
Der json_receiver ist ein per HTTPS im Netz erreichbarer Server, der empfangene Daten in meinem Netz als MQTT-Nachricht einspeist.